How can I prevent entry of dates from a previous year?
How can I prevent people entering a date that’s already been finalised?
Oooh… Usually data validation questions are all about creating drop-down lists, so this is a nice change. Data validation is actually a tool that’s used to restrict what can be entered in cells to criteria defined by the user. Although it’s commonly used to create drop-down lists, it’s capable of so much more.
I’m in the process of developing a whole mini-course on data validation that you can check out here, but in this tutorial I’m simply going to show you how to restrict the allowed value to a date greater than another date and I’m going to show you how to make that a variable date that changes depending on what’s entered in other cells. If you’d like to work through the activity in the tutorial, you can download it from this link Download the activity file here. If you’d like to view the video tutorial instead, scroll to the bottom of this post.
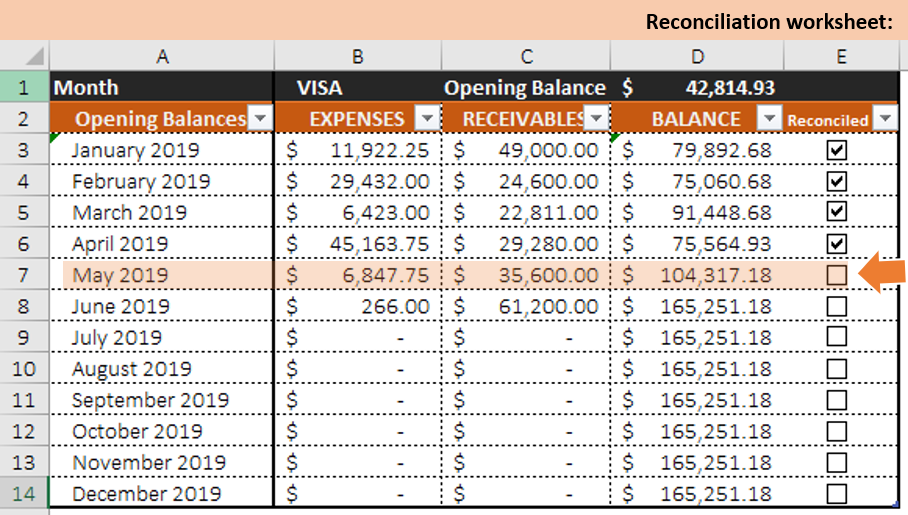
In this example I have 2 tables, on 2 separate worksheets. The first worksheet (the Reconciliation worksheet) calculates the totals for all transactions for each month.
The second worksheet (the Transaction worksheet) allows entry of all individual transactions.

As the reconciliation worksheet calculates the monthly totals from the transaction worksheet, we need to ensure that once the month has been reconciled – new transactions can’t be posted to that month. To do this, we’ll create a data validation rule.
Create a data validation rule that only allows entry of a date after (or on) a specific date
To apply a data validation rule to the date column of the transaction worksheet:
- Select the date column of the Transaction worksheet
- From the Data tab of the ribbon, click Data Validation to display the data validation input box
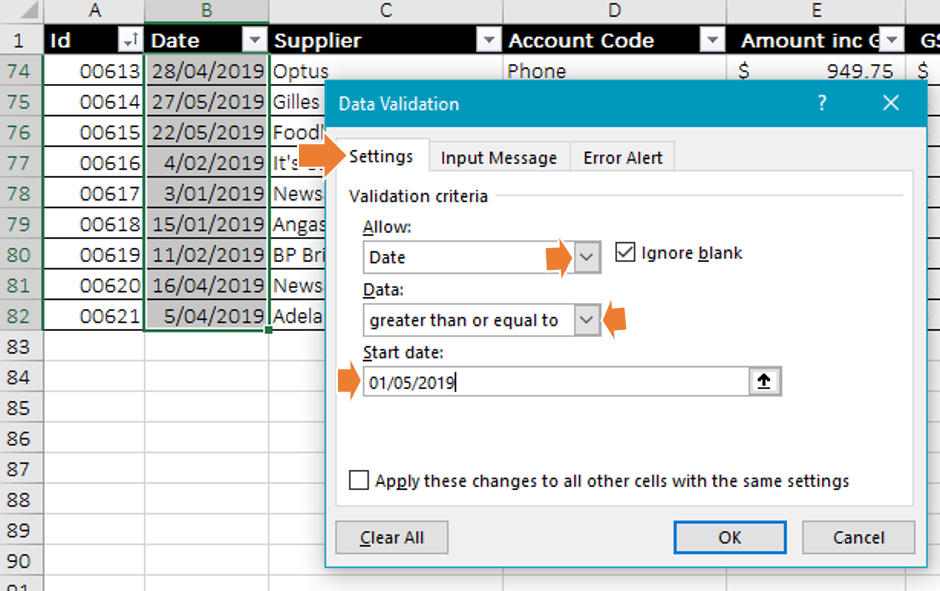
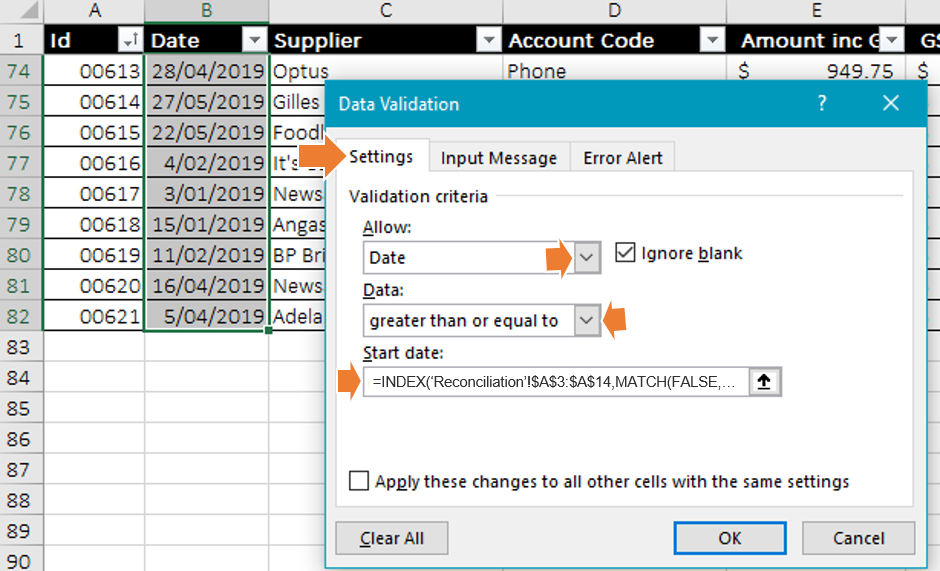
- Select the Allow drop down list and change what’s allowed from Any Value to Date
- Select the Data drop down list and choose your criteria. For our purpose, we want the user to only be able to enter dates that are after (or on) a specific date, so we’ll change the criteria to greater than or equal to
- In the start date box, enter the first date that will be allowed (the first day of the first month without a check in the checkbox): 01/05/2019
On the Settings tab:
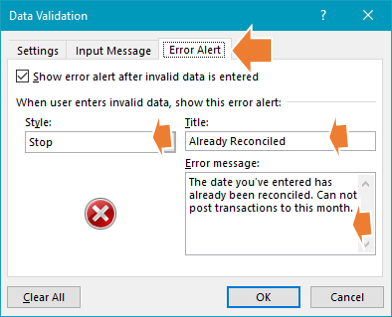
To display a personalised message when a user enters an invalid date, select the Error Alert tab:
- Enter a short message in the Title box
- Enter a message in the Error Message box
- Set the Style drop down list to Stop
- Click OK
Note While other styles are available (Warning & Information), changing the style to anything other than Stop will allow the user to overwrite the restriction
Alrighty, let’s test it out… In the Date column of the Transactions worksheet, try to enter a date before 01/05/2019. You should see your error alert displayed when any date prior to the start date is entered in the date column. Nice. Now click cancel on the message box and try again to enter another date on or after 01/05/2019
That’s really great, but… What happens when May has been reconciled too?
We’d have to change our data validation rule to only allow dates greater than or equal to 01/06/2019. Although it seems simple enough, it’s a tedious task that we’ll tire of having to do every month (and potentially forget to do it). So instead, we’re going to make our start date dynamic instead of fixed.
Create a Formula that determines the allowable dates
You’ll need to be familiar with Excel’s INDEX and MATCH functions for this bit. If you’re not familiar with these functions, you can sign-up for my free mini course here.
You’ll probably find it easiest to build this formula in a blank cell within the Transaction worksheet, then copy and paste it into the data validation rule once we’re done.
How the check-boxes work
The check-boxes on the Reconciliation worksheet have been linked to the cell that they’re in. The value of each cell is automatically set to either TRUE or FALSE, depending on whether the checkbox has been ticked or not, so the parameters for our data validation will need to be returned by a formula that finds the first cell that has a value of FALSE in the Reconciliation worksheet.
MATCH
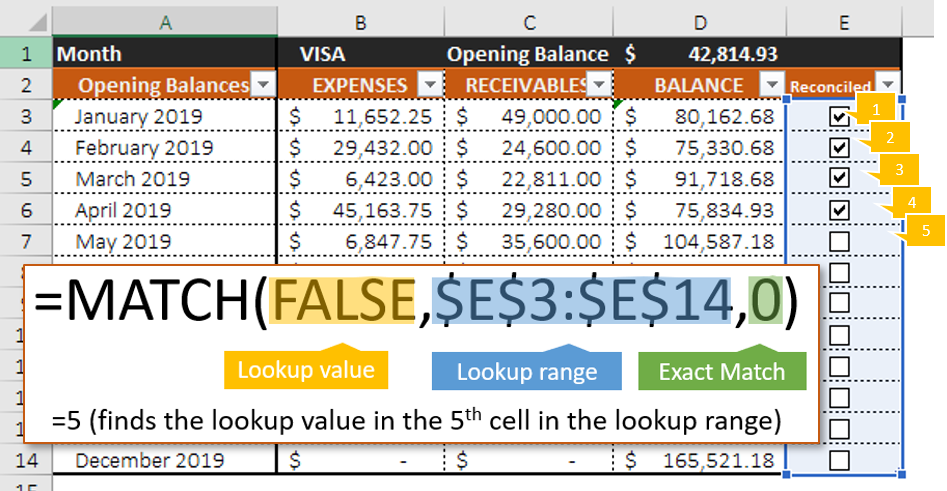
To find the first cell in the reconciliation column that isn’t checked (has a value of FALSE), we’ll use the MATCH function:
=MATCH(FALSE,’Reconciliation’!$E$3:$E$14,0)
This formula will return the number 5; as it matches the lookup value (FALSE) in the 5th cell in the lookup range.
INDEX
Now that we’ve created a formula to discover the row that has the first un-reconciled month, we’ll combine the MATCH function with the INDEX function to return the value from the date column (instead of just the position of the matching cell).
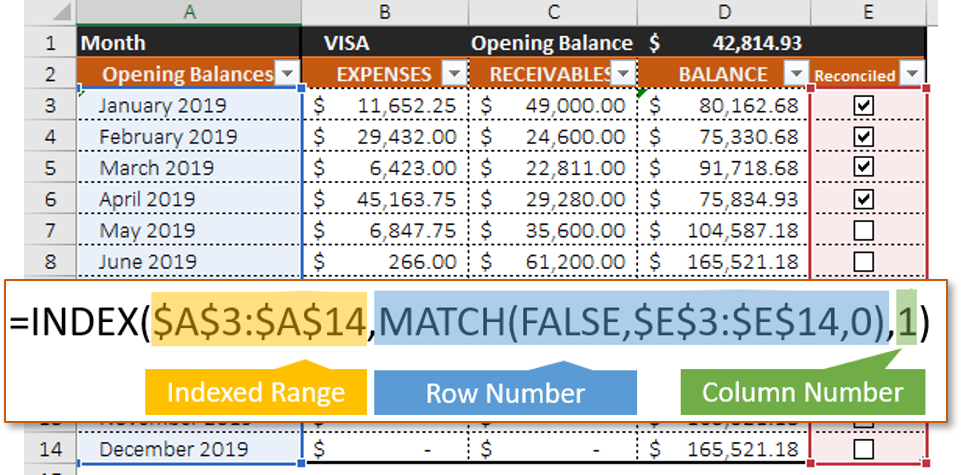
By using the MATCH function as the row number argument of the INDEX function, we can return the date (from column A), where the checkbox (in column E) is FALSE.
=INDEX(‘Reconciliation’!$A$3:$A$14,MATCH(FALSE,‘Reconciliation’!$E$3:$E$14,0),1)
This formula will return the date 01/05/2019 – as it Indexes the date column (A3:A14) and returns the value from the cell in Row 5, Column 1 of the indexed range. Perfect. This is exactly what we need.
Now we’ll just update our data validation rule with this formula…
- From the Data tab of the ribbon, click Data Validation
- Delete the existing date and enter the formula in the Start Date box instead
- Leave all other settings as previously set
- Click OK
In the Settings tab of the data validation input box that appears:
Note that the worksheet name has been added into the formula as the cells with the data validation are on the Transactions worksheet and the cells that the formula uses are on the Reconciliation worksheet
=INDEX(‘Reconciliation’!$A$3:$A$14,MATCH(FALSE,‘Reconciliation’!$E$3:$E$14,0),1)
Lovely.
Now let’s test it out again. In the date column of the Transactions worksheet, try to enter a date before 01/05/2019 and try again to enter another date after 01/05/2019. Check the box for May in the Reconciliation worksheet and try to enter the dates again. You should see your error alert displayed when a date prior to the first day of the first unchecked month in the Reconciliation worksheet is entered (01/06/2019). It’ll update when new months are reconciled so that new entries can’t be recorded for any month that’s already been closed.
Great work! Our dynamic data validation should now be working beautifully. When the next months reconciliation is done, the month will be closed and no more transactions will be posted – Awesome.
I hope you got a lot out of this one. This is just a teeny-tiny snippet of what you can do with Data Validation once you get curious enough to try new things. If you want to know more, you can pre-enroll for my data validation mini course here, and I’ll e-mail you when it’s live.
Stay curious!
Dani xo
Work through the Video Tutorials
I’ve broken the video tutorials into 3 short lessons, so you can jump into whichever one you like:
If you’d like to work through the activity file in the tutorial, you can download it from this link Download the activity file here
1 Determine the Parameters:
2 Setting up the Rules:
3 Making the Rule Dynamic!:
Cheers,

